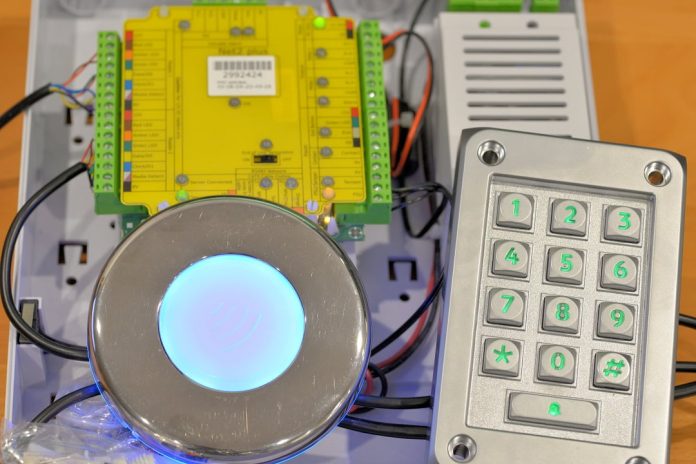
Recently, we undertook our first review of an access control solution, Paxton’s Net2 plus, which is distributed locally by Security Distributors Australia and is claimed to be the world’s simplest access control system to install.
TO test that theory, we decided we’d undertake a soft install of a Net2 plus controller, incorporating multiple readers and management software, then attempt to program the system and create a user database. In Part 1 of this story, we’d got the controller onto our network, downloaded the management software, connected a keypad and had found the entire process exceedingly simple.
As well as installing a couple of readers to the controller, the idea is that we have a play with configuration because that’s often the most time consuming part of the entire business. Having already linked a keypad to the Net2 plus controller, I kick off by adding a prox reader, which once powered up glows a warm blue. Same as everything else about Paxton’s UK-built gear, this reader is well made, with the electricals carefully potted and a nice polished stainless finish. The prox reader is not as heavy as the keypad but it’s no lightweight.
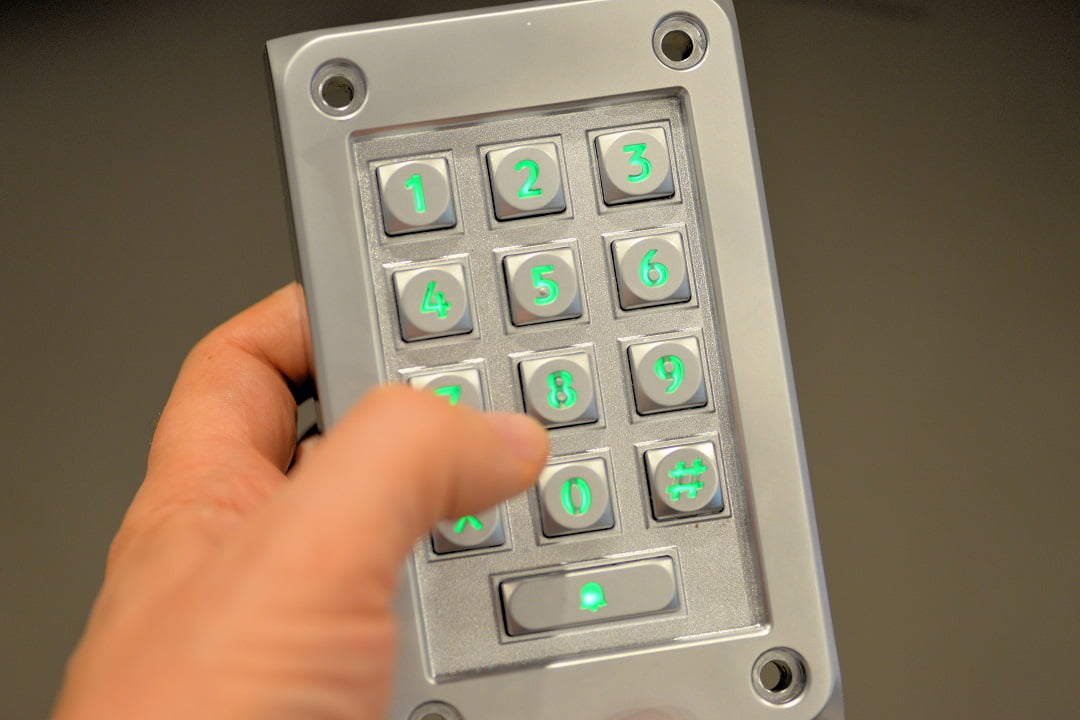
There are some moments of hesitation in all this but knowing Security Distributors Australia’s Wayne Krahner is only a phone call away, I pitch into the process. First, I add myself as a user. You add users from the home page or from the root directory – click Users and the empty user list comes up, with +User at the top of the column. I click +User and a window appears and I simply fill in the fields I need. Everything is there – name address, contact details, position, email, rego, notes, personnel number, PIN number or auto PIN, token number and type, and plenty more.
You can select the type of token that’s assigned every time you hit +User, you can drill in and get an image of the user. Once a user is in the system, you can then just assign them to any door as you go along, or you can nominate them global access to every door, all the time. If you want to edit or check any details, click users, double click the name and bingo, you’re in. You can add users manually, or import database files from a computer and then edit those.

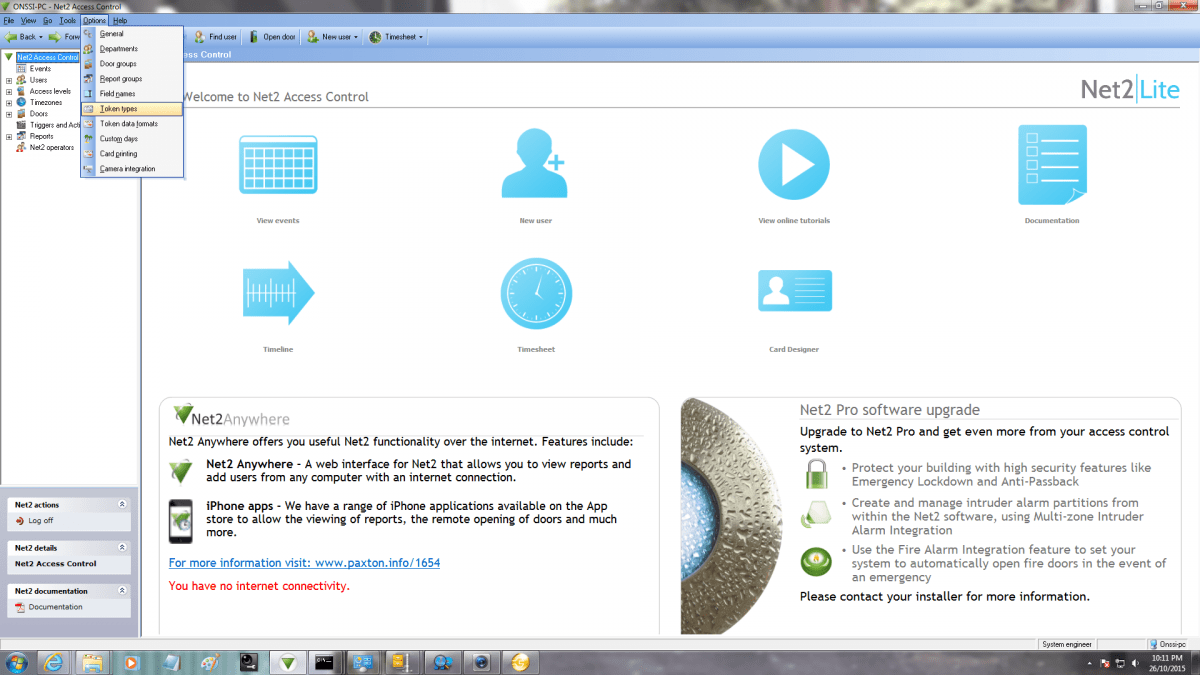
I expand my exploration in the root directory and hit Net2 Access Control and bring up the ‘Home’ screen with buttons for common functions like events, + New User, Online tutorials, documentation, Timeline, Timesheet and Card design. After looking at events, it’s time to check out the reader I just connected so I jump down the directory to doors, click on my controller number and with that single click I’m through into the place I’ll spend most my time during this installation.
Wayne Krahner has already given me a quick run through of door setup so I’m on familiar ground here. During the process, once the controller is connected to your network and readers or keypads are 8-wire connected to the controller, you click on Doors and select your controller and the 2 readers each controller supports will then appear in a window with options. In my case, I’ve got Reader 1 and Reader 2, with the keypad I hooked up a month or so ago automatically designated ‘In’ and the prox reader I attached yesterday designated ‘Out’. This automated capability is a feature of Net2 plus that I really like.
Another feature of Net2 plus I love is that it’s not just very simple – it’s very simple from wherever you happen to be in the software. That might be the Home page, it might be when you’re in the controller when the entire ecosystem of the ACU is laid out before you, like rural fields and creeks from a high place.
It might be when you click Options on the command line and all the options drop down. I might be when you click an option and a window opens allowing you to access a functionality but in that same window in the form of tabs, are all the options from the Options dropdown. It’s a beautiful thing. Whenever and wherever you turn, all Net2’s functionality is at your elbow. Suddenly, I find myself very comfortable with Paxton Net2 plus.
Net2 plus System Setup
Something I discovered last month was just how simple it is to get your controller set up in Paxton’s Net2 Access Control Software. Bear in mind, I’ve already downloaded the software and installed it on my workstation but that was hardly difficult. With the controller connected, and my readers hooked up, I’m ready to have a play around. It’s here that the fun really starts. When you’re connected to the controller under Doors with all the ACU functions at your feet, you can pretty much do everything.
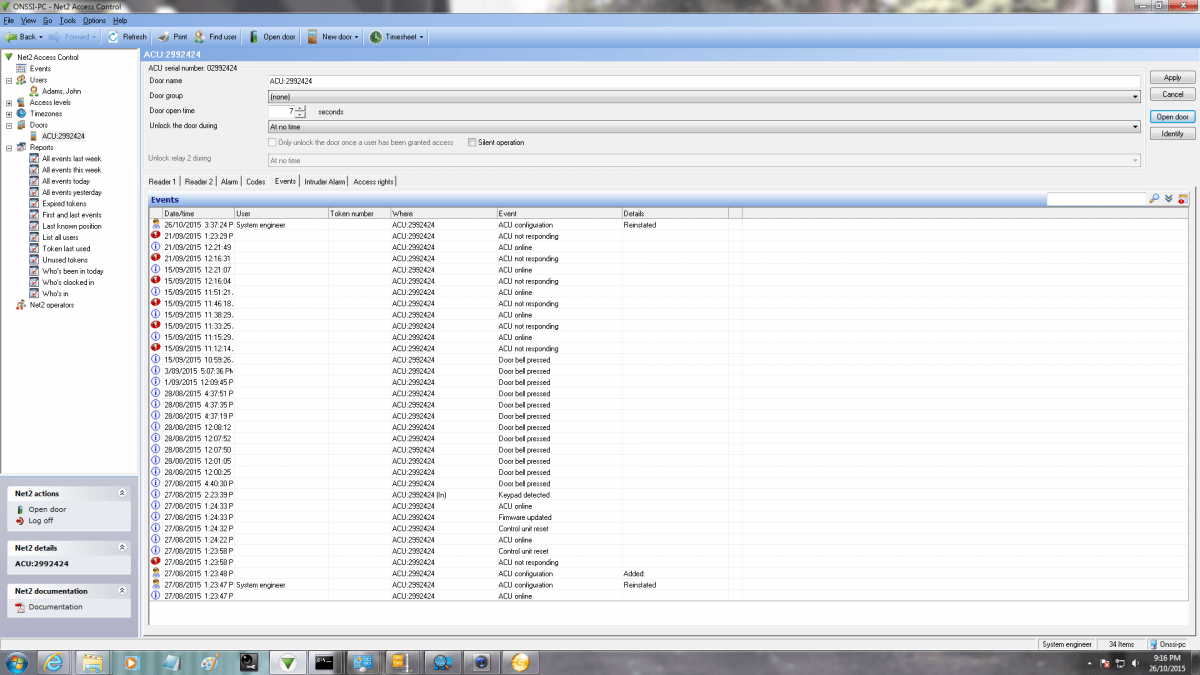
You can assign a door name, a door group, a door open time (I set mine for 7 seconds), unlock the door settings based on time of day. You can set an operating mode, select token types – Paxton or third party. I set my reader up for PIN only and my prox reader up for token only. In the same window, there’s alarm options – duration of alarm, delay before sounding of alarm and more – you can also click to Door left Open alarm with duration and repeat; same for PSU failure and tamper. What’s nice here is how easy it is. Everything is always at your fingertips.
Once the controller is registered, readers are automatically assigned and once users are in the system you can assign them to doors, or all doors, automatically or with a click. Next door to alarms is the code programming tab (a single 4-8 digit code for the system) that allows PIN numbers to be assigned and changed. Next comes the Events tab – it shows every Event that applies to the system – mine only has the one controller so it’s simple but you get time, date, user, token number, controller number/door name, event type and details.
The next tab is for intruder or fire alarm integration. Yeah, this is very cool. You select enable alarm integration with this ACU and select NO or NC, depending on the nature of your alarm or fire alarm system circuit, so as to allow the Net2 controller to arm and disarm the alarm panel. I select “When contacts are open, the system is disarmed”. You then set the duration of the signal pulse. Next, there’s a “Push to make” button – when a valid credential is presented you can choose how long the re-arm button should remain active and pick an operating mode that applies to the access control system when the alarm is armed. It might be token, PIN, Token, PIN and Code.
Access rights come next and as I’m the only user in the system, it’s not hard. I have already assigned myself In/Out access all day, every day and the display simply shows my access level. Typical Net2, you can undertake core operations in multiple ways. To create a new user, you can take a token or card and drop it onto a reader and up pops the user screen. You name the user, select the time/date of expiry and when you click on the adjacent Access rights tab and the doors come up, you select the doors the user needs access through and click apply and you’re done.
Expanding the system is fun, too. Because all you are doing is completing the same processes over again. Click ‘New Door’ in the topmost command line and a box appears. Select the control unit type you’ve powered up and linked to the switch on your network or subnet, then enter the serial number and door name and then click ‘Add’. Click on doors, then at the bottom of the screen click ‘Detect’ and the new ACU will come up under the list of doors, as well as appearing in the root directory.
To program alarm parameters, assign reader types and tokens, check access and all the rest, just click on the ACU number in the directory and get stuck in. Any user who has been assigned all day, every day, all doors access, as I have, automatically comes up as a user of the new reader when you click Access. Access levels include none, all hours and all doors and working hours, while Timezones include No time, all day and every day, working hours.
Fundamentally, access levels are a combination of a door and a time zone. With Net2 plus, you simply create a time zone and then select it when setting up doors. Once the time zone has been created it’s always there to be selected. I’m set up for all day every day but you can play with this ad infinitum. The same thing applies to holiday schedules.
Written out in words it sounds more complex than it is. In the root directory, you click Timezones, then select working hours (there are other options) and simply define your times by clicking on a day and then selecting start and finish times for that day by dragging a bar or clicking a counter. When you’re done, go to the next day, click on the timeline, select the time, repeat. The same thing works for public holidays.
Triggers and Actions
Triggers and actions is something that really deserves some attention. It’s pretty amazing when you get your head around it. Same as everything else about Net2 plus, this functionality, with the least possible effort from me, does magical things without my needing to be a brilliant integrator. It allows use of a laundry list of events to drive a complex local or remote response.
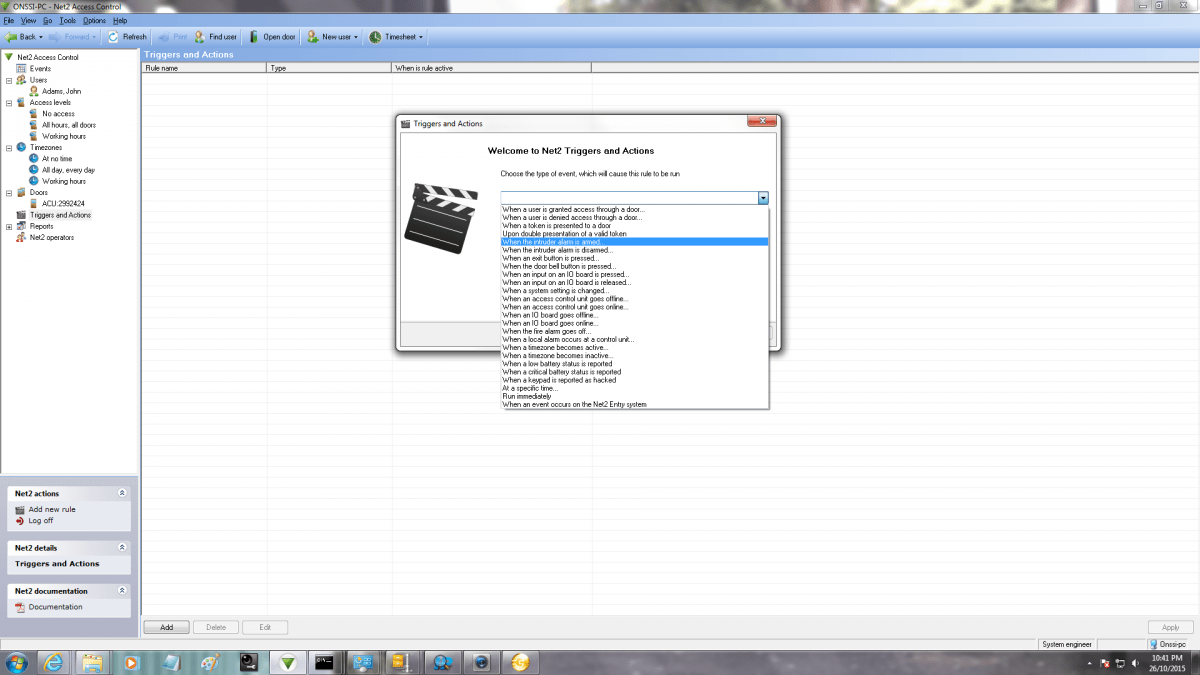
Events like double presentation of a valid token, arming of the alarm system, when the keypad doorbell is pressed, when an ACU goes offline, when a fire alarm goves off, when a keypad is hacked, when a battery fails and loads more, can be used to drive actions. These actions include things like, play a file, send a text, email, control a lockdown, drive a relay, and allow temporary access. When it comes to driving relays, you can select turn off, turn off, turn on for a selectable period of time.
There are comprehensive reports that can be generated based on users, tokens, event times, who is in the building right now, who has clocked in during the day, last known positions, first and last events and many more. All these, and everything else about Net2 plus software programming, is designed on the basis of long experience, to offer installers and users a selection of those functions they are most likely to need.
Another great capability is camera integration. Again, it’s very simple. You find an NVR on the network (I don’t have one connected at the moment), slot in the IP address and the system will populate that area with the cameras from that NVR. Best, you can associate doors with cameras and the system automatically populates the door with a little camera icon underneath which is video anytime you click on an event involving that door. Net2 plus’ integration is simple, but it’s profound.
Conclusion
I started the process of installing a Net2 plus controller with a degree of trepidation. By the end of it, I’m very comfortable mucking around with Net2 plus and its management software, adding users, tweaking access rights, adjusting triggers and actions of events, adding doors. The software gives me fingertip control from almost anywhere I find myself – there’s nothing scary about it.
But most importantly, the functionality of the system is not compromised by its simplicity, There are layers of integration in Net2 plus that allow it to integrate with alarms, drive relays and incorporate video surveillance. Managing user databases is simple, too. The Windows-based software has a very familiar feel and whichever direction from which you approach a task, the design of the software guides you effortlessly to your destination.
Alongside functionality, my lasting impression is of simplicity of installation and simplicity of programming engendered by the intrinsic support of clever engineering and endless documentation, with every function laid out comprehensibly, all explained and supported by online tutorials. Layers of support are embedded into Net2 Access Control software and they’re with you from the moment you open the system, alongside a selection of key functions you access with a click. This partnership of simplicity and support – that’s what Net2 plus is all about. ♦
By John Adams
Features of Paxton Net2 plus include:
* RS485 Dataline and TCP/IP
* 2 voltage-free relays
* 2 reader ports & 1 intruder alarm port & relay
* Paxton and third party 12V DC readers
* 10/100 Ethernet port and RS485 data line connector
* Switchable termination resistors with LED
* Net2 plus and Net2 Classic work on same system
* Available from Security Distributors Australia
* 5-year warranty on all parts no matter what.


