ONSSI Ocularis IS, distributed locally by BGWT, is a sleek and intuitive video management solution that offers comprehensive capabilities at multiple levels and supports local and enterprise applications.
ONSSI Ocularis has always been a pleasing video management solution and over the past few years the systems fundamentals have remained the same, while additional capability has been polished into the system. In this feature I’m going to take a look at the process of installing ONSSI IS onto a server and then installing and programming cameras and driving the system.
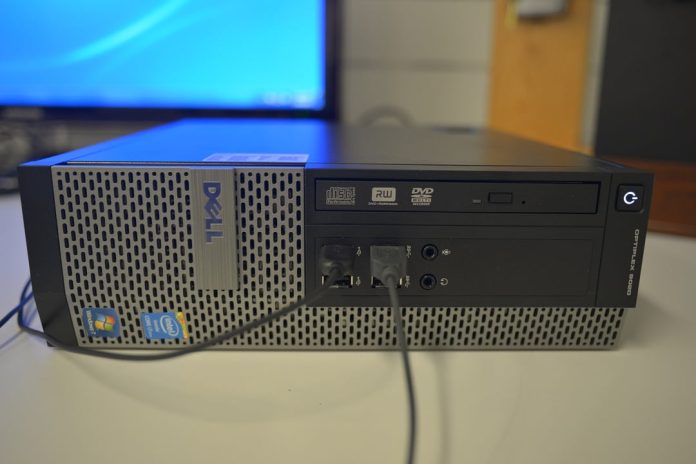
The system we’re building is the new SEN camera test bed. Our hardware is a Dell 9020 server workstation with an Intel i7-4770 quad-core processor with 8 threads of execution per core – ideal for handling multiple streams of high resolution video. Clock speed is 3.4GHz, we have 8GB of RAM, expandable to 32GB, and a 500GB HDD, which is plenty for testing.
The Dell 9020 sports a dedicated AMD Radeon R7 250 graphics card with 2GB of RAM. With one of the best processors available and a dedicated graphics card, this is a strong unit that will allow us to get the best out of the cameras we review. We have 290W of power onboard for powering auxiliary devices, along with 8 USB 2.0 and 4 USB 3.0 doorways. A Netgear GS108P ProSafe 8-port Gigabit switch with 4-port PoE ushers cameras into our subnet.
The base operating system of the Dell 9020 is Win7 Professional and what we’re doing is loading ONSSI’s Ocularis IS onto SEN’s new server, installing cameras and taking the solution for a few laps around the block. With ONSSI Ocularis, there are a number of different installation packages for local applications, including IS, CS and PS. All share similar architecture and have no limit on expansion of camera numbers or storage capacity. Ocularis enterprise applications are LS and ES.
Installing Ocularis IS
Assisting with the process and giving me a simultaneous demonstration of the Ocularis IS solution is Graham Clark of ONSSI’s Australian distributor, BGWT. According to Clark, the process of installing ONSSI onto the server is a relatively simple one. If you are sorted with licenses, then it’s a matter of procedure.
Watching Clark work, it quickly becomes obvious this is true. Simplifying matters, in this small application we’ll have everything on a single server workstation but in larger systems the structure might include a base on a smaller server and then a recorder on another server in another location. That can complicate the commissioning process thanks to the addition of steps but it remains straightforward enough.
Under the root directory in C drive Clark has created a folder called ‘Installs’ which has all the install files, as well as a text file with base SLC’s, which is the license identifying number. In the same file, there’s a license file we can use to license the recorder.

BGWT's Graham Clark
“As far as ONSSI installation goes, you download one file, it’s the same file for PS, IS or CS, and launch it. That file extracts Ocularis components from a remote server and saves them into a folder I’ve created here on this machine,” Clark explains. “So first we install the base and after that it’s a next, next, next thing via the wizard.
“Ok, that’s the base done,” says Clark, pointing at the monitor screen. “If you are doing a new install, all you have is that icon on the desktop – it’s the license activation tool. What you do from there is enter your SLC by browsing into the license server, the status pops up, tells you if you have a plan in place, the expiry date and a summary of your base licenses.
“You click on ‘install Ocularis components’ – which takes you to a flash website and each component is installed on the machine from that website. All the install packages reside on that base and the great thing about this is that if 12 months down the track someone wants to add a new client or recorder server, it’s very easy to do – you just click and follow the wizard.”
We set about installing Ocularis components and, like the base, it’s a simple process. To install you simply click on the recording component and hit yes. Along with other components like Management, Recorder Manager and Client, there’s the proxy, which is a separate piece of software we might use when connecting alarm inputs to the base. Clark bounces through the wizard, next, next, next.
“As you can see, we now have all these icons on the desktop,” he says. “Top is the management application – that’s your recorder manager and you’ll spend quite a bit of time configuring cameras on the system, configuring recording parameters and bit rate settings.
“The next one down is Ocularis Admin – it’s used to configure the base. Anything that’s global to the system. Anything to do with views, user setup, permissions, anything that might be held in that central database to do with access, alarms.”
Next is Ocularis client, which is a cockpit from which to drive cameras linked to the system. Underneath these icons is a viewer – it’s used to connect directly to a recorder and view footage in raw. There’s an export viewer as well and the proxy, along with the driver pack and License folder.
Installing cameras
With ONSSI Ocularis successfully installed, it’s time to add a camera. The process is handled in the management application. There’s a wizard when you first run this application that lets you adjust basic settings but you can add everything manually later through the tree directory. It’s simple, though I manage to get lost in the tree directory the first time I install a camera by myself.
We instruct the system to scan the network for cameras and find a couple. It’s easier to scan for all manufacturers on a network with a small number of cameras than to scan down the huge list of compatible camera makers ticking boxes. The system automatically selects cameras it has direct drivers for.
The first thing to do is set up the camera so it’s on the same subnet as the machine. With our DVR defaulted to 0.10, I set the first camera to 0.20 by browsing into the default IP address using the manufacturer’s integrated utility. It’s straightforward. I open explorer, find the camera, double click, download the browser and change the IP address.
“Install packages reside on that base and the great thing about this is that if 12 months down the track someone wants to add a new client or recorder server, it’s very easy to do”
Once the system has scanned and discovered the camera, you can access it through the directory tree in Ocularis RC-1 management. The tree operates on the basis of drop-downs and you click on an adjacent + symbol to open more options. If you are changing the IP address of a camera you go into hardware device, if you are just changing the settings of the camera, you go into settings.
“There are 2 main sections when it comes to managing cameras and recording with ONSSI,” says Clark. “A lot of things within the recorder are replicated, so there are multiple ways to get to the same settings. Each camera is represented in 2 ways. You have your hardware device here, here are the basic IP settings and your driver. But if I click on the camera and click on properties, there are more settings, including camera properties and settings for video, audio.”
Later on when I’m exploring the system by myself I spend some time with the Camera Properties tool, which allows you to tweak settings. Options include adjusting settings like contrast, hue, saturation, target bit rate, stream profile and more. Once you select a camera setting here, you then push that back out to the camera. Alternatively, you can make that change to the camera via browser and Ocularis Manager will pull it in as well.
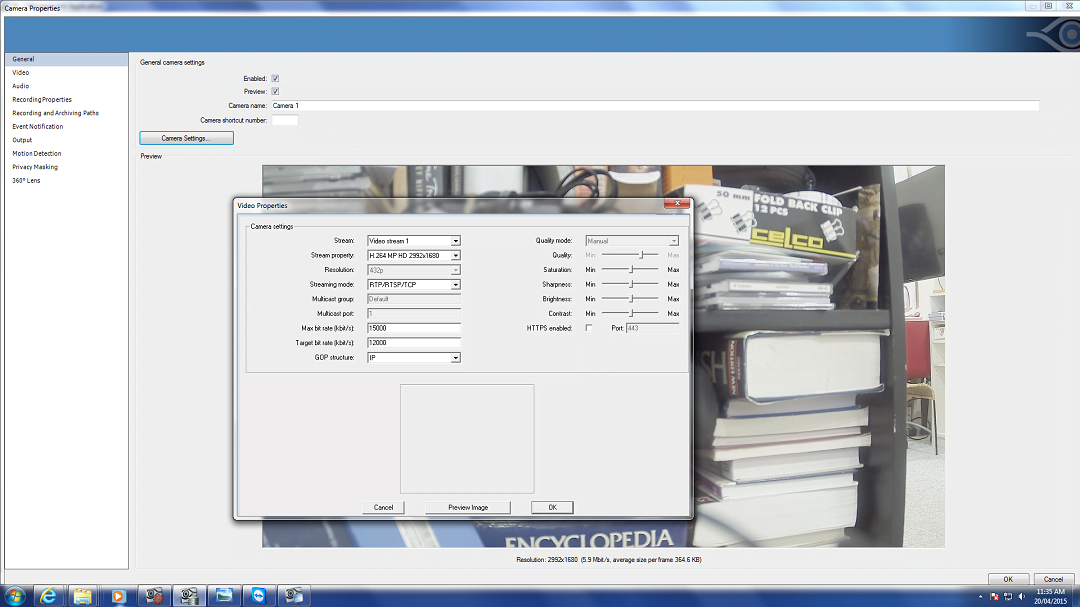
ONSSI Ocularis IS camera settings.
According to Clark, this Camera Properties screen changes a lot depending on the level of integration between the camera and the VMS. With brands like Axis, Sony, and Bosch, you have many settings, while others may just have streaming. The 2 tabs that stand out include General for camera settings and Video where you adjust things like frame rate. Additional functionalities in General include recording and audio, motion detection, event notification, privacy mask, 360-degree lens setup and others. Selection of the archiving path is located here as well but with a single 500GB platter, that won’t change for us just yet. We set up camera and video settings with recording properties of ‘Always’.
“When you add a camera, particularly if it’s a live view, what you do is get into Ocularis administrator and follow the tabs from left to right,” says Clark. “We’ve added the camera to the management of the recorder, so the next thing we want to do is refresh the server to save the configuration of the camera. Each time you do this, you then see the cameras here in the dropdown directory. If I remove a camera, it will still exist in this base until I refresh again.
“From there you go to Users and give permission to the camera,” explains Clark. “You do this by finding the cameras that are unprivileged and selecting them by right clicking and going to new group, or by dragging them down. That gives permission to admin for those cameras.”
A tab that’s useful for live management of a system is views, which can be selected in multiple configurations. Regardless of screen configuration, each of these tiles can contain a default camera and you set them up by clicking and dragging a camera across. There are also carousel settings if you have multiple cameras.
“There are also default conditions that can happen on a view – hotspot – which brings a thumbnail up to view,” explains Clark. “The Web option lets you display a URL in a tile rather than a camera, while push video allows operators to right click on video and push it to a supervisor. Black screen is if you have a blank alarm screen that you want to react with different behaviour depending on what the event is.
“Let’s create a 4-split screen,” suggests Clark. “That means if you are testing multiple cameras and you want to select a view and the system will brings them all up, it only takes 2 second to drop the cameras you are testing onto the view. The process for this is to add the cameras to the recorder management. Once they are there, save or exit and save. Then you go into servers and refresh the server. Give the camera privileges under users and add them to the view.”
Driving cameras
Next we log into the client and the camera views we’ve set up are all there. To access the views we click on Views, select the folder we are after and any view can be brought to full screen by clicking on the top.
“You can see a few controls down the bottom of the screen which allow you go into instant playback,” explains Clark. “That’s handy for sites with live monitoring as it allows you to review instantly form the live screen. It also has benefits when using dual streaming. You can record entry cameras in JPEG for face recognition and view in H.264– H.264 tends to blur fast motion. When they see an incident, they can switch to playback in jpeg and get a perfect clear image every time.
“To select another camera that’s not on that view, you right click, and select the camera and away you go. You can copy to clipboard and take a snapshot. There’s a setting to take a snapshot which resolves to a default path. This can be run as full screen or multiple screens.
A snapshot is exactly that – a still image of whatever is on screen at a given moment. Clark creates a folder on desktop for snapshots. Something I really like about ONSSI is its organic nature of operation. The mouse wheel zoom and click and drag zoom with digital PTZ within either is a lovely simple bit of dual fingertip functionality. And it applies to snapshots. If you want a full screen image then you take the shot when viewing a full screen. If you want an image of digital zoom or an area of interest, you wheel or click and drag in then take the shot.
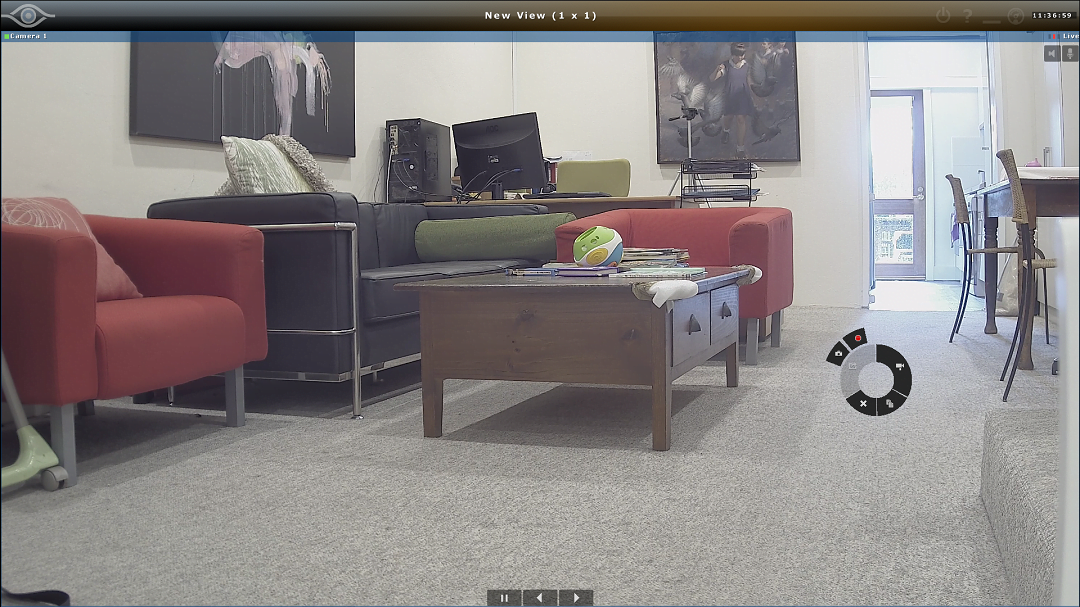
The embedded dashboard appears wherever you right click. This image is from Bosch's Starlight and the distance from the lens to the back fence is more than 15m.
Other features include shortcuts that can be added to the keyboard to speed up access of key functions, and there’s joystick functionality, video wall capability and triggers. There’s PTZ scheduling and plenty of things to do with alarms and presets. I take note of these but don’t set them up for this small application. Functions are exceedingly simple. To remove a camera, you just delete hardware device in the directory and it’s gone.
When it comes to investigations, your click on Browse at the top of Ocularis client. Once you are in browse with a camera view, you navigate the timeline and click controls including play and reverse and frame by frame. There are motion events, as well as oldest frames and newest frames. Ocularis IS has a nice timeline, you just swish it left or right to go forward and back and click once in the timeline to freeze a scene.
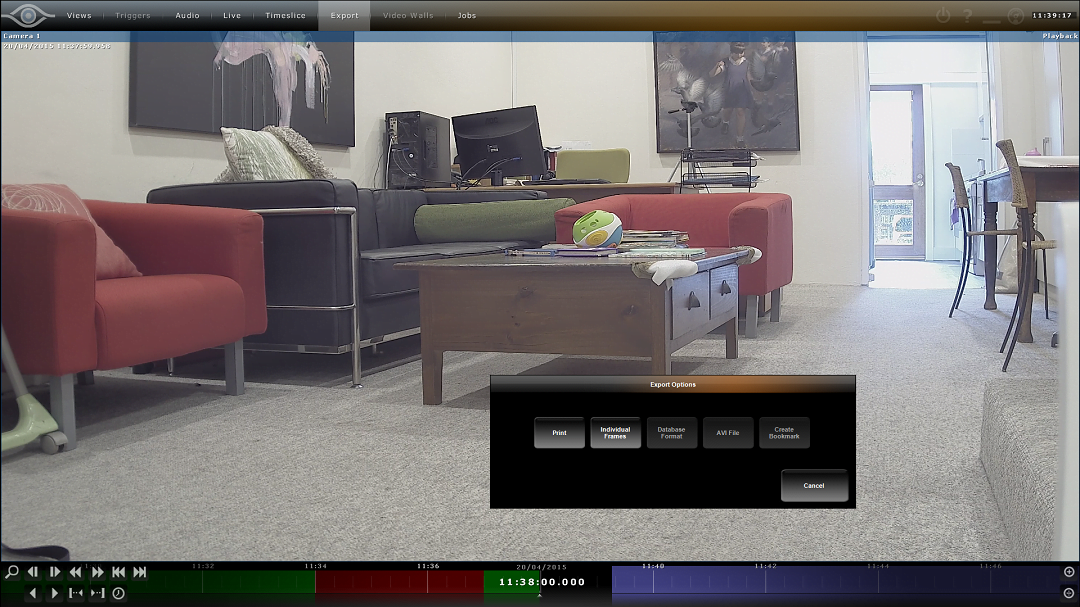
Ocularis IS timeline and export options.
A feature that’s nice for investigators is that if you’re looking at a camera view for a particular time and want to change to another camera, you just drag the new camera into the tile and it will automatically sync to that time period you’ve been exploring in timeline. This sort of thing is typical of Ocularis. In a very short time I find driving this system’s viewer starts to become second nature.
The right click function wheel that hides in any image tile is particularly good. Whether I’m looking at live view or swooping around the timeline it is only 2 clicks to snapshot. If I want to zoom then take a shot, then it’s a mouse wheel roll with forefinger and 2 clicks to snapshot. For operators who need to get face IDs on the fly, this is a really easy system to drive. I love this about Ocularis.
“The mouse wheel zoom and click and drag zoom with digital PTZ within either is a lovely simple bit of dual fingertip functionality”
To do an export of video there are one-click Set Start and Set Stop markers on the timeline. You click on timeline at the start of the scene you want, then sweep through the footage on the timeline hit Set Stop. You can play and watch the event, or drag and drop the region to be exported – just hit the start marker, drag timeline, hit stop marker. A range of options are available to investigators including printing shots, thumbing through individual frames – this last one appeals to me.
With export files, there’s password protection and encryption. You basically give the footage a name, select a path and away you go. You can also add a preamble – recorded at this date by this operator, who took this action.
Additional features
A nice feature is Database format, which allows you to store footage over a long period of time. After opening an image stream in the Database viewer as part of an investigation, you can reopen it, create AVIs (Clark recommends third party xVid) and export small pieces, take snapshots – the video stream behaves as if it’s live on the system. The same functionality applies to multiple cameras when you export. Finally, there’s bookmarking. It exports footage and puts it on a separate location on the Database and allows you to go and find it later on the same machine.
A feature you can use to streamline investigations is Timeslice. You select your Timeslice interval, pick a camera view on a tile, click on it and sliced recordings of that view are brought up with controls like play, rewind, reverse, pause, export, etc. And no matter where you are, snapshot is 2 clicks away. Having all this functionality right there with recordings means that during investigations you don’t have to keep minimising your way back to a separate screen.
There are also sequences and you can play with motion settings, 10 per cent of a frame within 500ms might be needed to justify an event you want to see during a search process. You can go forwards or backwards in time and drill down through the time periods to find what you are looking forward. At any stage in Browse or Timeslice, if you want to get back to live views, you just click on Live View at the top of the screen and you are live.
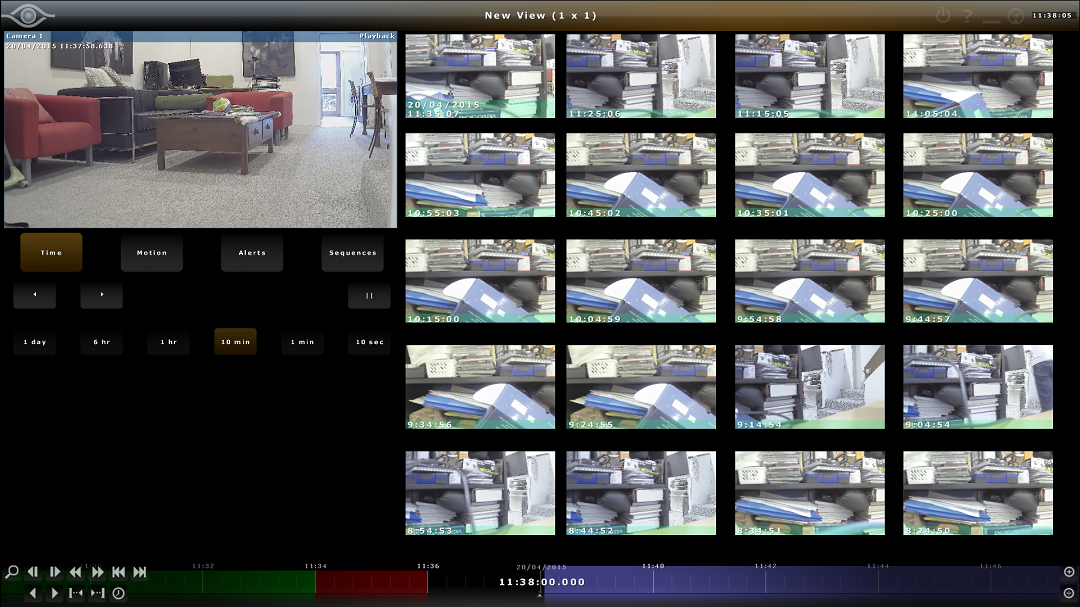
Ocularis' Timeslice feature is handy for investigations.
Investigators will also appreciate the Jobs section. If you are doing a large export, it will be listed in Jobs, along with a progress bar. You can cancel an export from Jobs. Up here on the right there are Log off and Shutdown functions, as well as Help files and the Minimise control. There’s also a dashboard that gives operators or users an understanding of how much memory and RAM their system is currently using.
While we’ve got our system setup and added a camera, larger applications are going to shake out even more functionality and there’s plenty of that to be had. Some nice functionalities of Ocularis IS include Active monitoring, Alert management and integration with access control, video analytics, and other 3rd party systems.
With Ocularis Alert, operators and users can use automated and manual push video alerts to stay on top of an unfolding event. This works with an unlimited number of concurrently-connected video clients and up to 64 cameras per server. Other supported third party integrations such as video analytics, access control, or license plate recognition for a tighter security overall.
One neat thing we have not set up is Ocularis Mobile. This allows users to fire 16 HD camera streams at high speed and full frame rates, over 3G/4G networks, so operators, security officers and security managers can monitor and control individual cameras, and browse recorded video via mobile devices. There’s integration too.
“Ocularis also has event fusion, allowing you to escalate events based on logic”
“Ocularis has the ability to use its Generic Events functions to create an alert/alarm in the system,” says Clark. This allows you to configure the system to listen on a nominated port for a ‘contain or match’ on a string. If this is received, you can then create an alarm. This is a great way interfacing other IP systems without dedicated HLI’s.
“Ocularis also has event fusion, allowing you to escalate events based on logic – if there’s motion on Camera 1 and 5 seconds later motion on Camera 2, then register an event. Or if there is a card swipe detected by the access control system and IVA detects 2 people entering, trigger an alert.”
According to Clark, the greatest thing about Ocularis is that it scales.
“It doesn’t matter if you have an entry level PS or a top of the range enterprise ES, they have the capacity for an unlimited number of cameras,” Clark says. “The main restrictor is the number of cameras per box. With PS you can have 26 and with IS, (which I have), you can manage up to 64 per box. There’s no limit to the number of servers the system supports.
“And you can upgrade any system by installing over the top as long as you have the appropriate licenses. The migration is very easy. You can start with PS and migrate to IS and there’s no need to reconfigure or backup and re-import. Ocularis is designed to be intuitive in every aspect, from setup and upgrade of an existing solution, through to day to day operations and investigations.” ♦
By John Adams
Features of ONSSI Ocularis IS include:
* 64-bit recording
* Open-architecture, non-proprietary, ideal for integration
* Per-camera config of streaming, recording and archiving
* Flexible storage allocation
* Central management for alerting, shared event handling, client asset and user authorization data
* Intuitive unified video client
* Complete video wall management
* Live monitoring with instantaneous investigation
* Multiple investigation tools
* Shared event handling
* No certification required.


